When you sign in to the Call Center client, your ACD (automatic call distribution) state is set to the post sign-in ACD state set on the Settings page.
To manually change your ACD state:
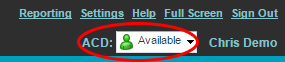
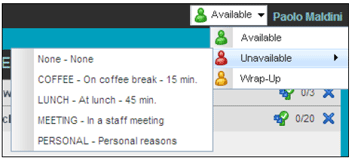
- At the top right-hand side of the main Call Center client window, click the ACD drop-down and select an ACD state from the list.
- If you select Unavailable and your company requires you to provide a reason for your unavailability, select an Unavailable Code from the drop-down list.
ACD States:
| ACD State | Icon | Description |
| Available | Agent is available to receive ACD calls. | |
| Unavailable | Agent is unavailable to receive ACD calls. | |
| Wrap-Up | Agent is performing post call work. | |
| Sign-In | The Sign-In state is equivalent to a “clock in”, which means that the agent is at their work location but not yet ready to accept incoming calls | |
| Sign-Out | The Sign-Out state is equivalent to a “clock out”, which means that the agent’s workday or shift is completed and they are leaving. |