You can create a new conference if you have host privileges on a Meet-Me Conferencing bridge.
- Log in to the UCx Web Portal at ucx.telepacific.com.
- Click Meet-Me Conferencing on the left menu.
- On the Meet-Me Conferencing page, click Conferences.
- On the Meet-Me Conferences page, click Add.
- The Meet-Me Conference Add page opens.
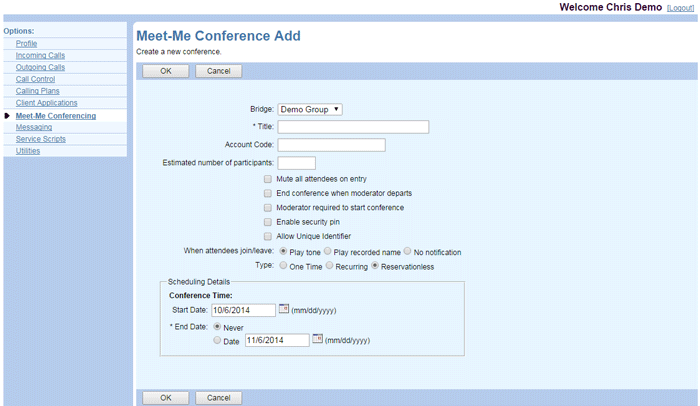
- From the Bridge dropdown, select the conferencing bridge you want to use.
- In the Title box, enter a name for the conference.
- (optional) In the Account Code box, enter an account code to be included in the call detail records (CDRs) for the call. The account code can be any string of digits; it does not need to match an account code provisioned for the group.
- (optional) Enter an Estimated number of participants for this conference. If this number exceeds the participant limit defined by your administrator and/or the maximum number of ports available on the bridge, a message appears informing you of the allowed maximum.
- (optional) Add restrictions on the conference by checking one or more of the following options: Mute all attendees on entry, End conference when moderator departs, Moderator required to start conference, Enable security pin, or Allow Unique Identifier.
- A Security PIN is generated by the system when the conference is created, and can be viewed on the Meet-Me Conference Modify page. When this option is enabled, conference participants and moderators must enter a security PIN to join the conference.
- When the Allow Unique Identifier option is enabled, both the moderator and the participant have the option to enter a unique identification code after accessing the conference.
- For the When attendees join/leave setting, select one of the following options: Play tone, Play recorded name, or No notification.
- Specify the conference type: One-Time, Recurring, or Reservationless. The options in the Scheduling Details box change depending on what you select (see below for further details).
- Click OK to save changes, or Cancel to exit without saving.
Options for a One-Time Conference
Select the Start Date, Start Time, and Duration. For Duration, the hours field has options of 1 hour through 23 hours, and the minutes field has options of 00, 15, 30, and 45 minutes.
Options for a Recurring Conference
A “recurring” conference is one that is scheduled with multiple occurrences at regular intervals (daily, weekly, monthly, or yearly). For a recurring conference, select the Start Date, Start Time, Duration, Recurrence Pattern, and Recurrence Range.
Options for a Reservationless Conference
A “reservationless” conference has no specific start or end times. This type of conference can be used to start a conference call at any time.
When there is a system-level conference end date restriction, the Start Date and End Date options appear. The End Date is pre-populated with 1 month from the current date.