- Home
- Knowledge Base
- Settings in Call Center Client
- Call Center Supervisor – View Real-Time Statistics
Call Center provides supervisors with real-time information about their supervised agents and queues. This information is displayed in the Dashboard. You can also navigate to a selected agent or a queue directly from the Dashboard.
Display Dashboard
To access the Dashboard:
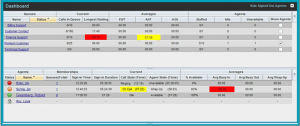
Click the Dashboard link at the top right-hand side of the main interface window. The Dashboard is launched in a separate window and can be open at the same time as other Call Center windows.
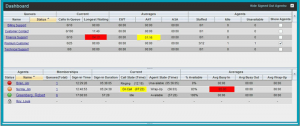
The Dashboard is divided into two parts, with queue information in the top half and agent information in the bottom half. The information is updated at a configurable refresh rate. The default is 5 seconds.
By default, information about agents is hidden. To view agents staffing a call center, check the Show Agents check box in the row for that call center.
Some fields are color-coded to provide visual indicators of threshold severity. Threshold values are configured by your administrator.
| Severity | Color |
| 0 (no threshold crossed) | No color |
| 1 (yellow threshold crossed) | Yellow |
| 2 (red threshold crossed) | Red |
Queue Information
Format: header 3 Queue Information
The Dashboard displays each call center queue on a separate line and provides the following information about each queue:
- Name – This is the name of the call center.
- Status (Premium call centers) – This identifies the service mode in which the call center currently operates, which can be one of the following:
- Night Service – The call center is processing calls according to the Night Service schedule and policy.
- Night Service Override – The call center has been manually forced to follow the Night Service policy.
NOTE: The Night Service or Night Service Override status appears only if the Night Service policy is triggered, either by the Night Service schedule or by a manual override, and if the action to apply to incoming calls is set either to “Perform busy treatment” or “Transfer to phone number/SIP-URI”. Setting the action to “None” acts as if the Night Service policy was not triggered and the Night Service/Night Service Override status is not displayed in Call Center.
- Holiday Service – The call center is processing calls according to the Holiday Service schedule and policy.
NOTE: The Holiday Service status appears only if the Holiday Service policy is triggered and if the action to apply to incoming calls is set by an administrator to either “Perform busy treatment” or “Transfer to phone number/SIP-URI”. Setting the action to “None” acts as if the Holiday Service policy was not triggered and the Holiday Service status is not displayed in Call Center.
- Forced Forwarding – All calls to this call center are forwarded to a specified destination.
- Normal – Call center is in normal mode of operation; none of the above modes is enabled.
NOTE: When the call center is in Normal service mode, the Status field is empty.
- Calls in Queue – This is the number of queued calls expressed as a ratio of the total queue capacity for that call center. For example, “6/10” means that there are six calls in the queue, which can queue a maximum of ten calls.
- Long Waiting Call – This is the waiting time of the call that has been in the queue the longest.
- EWT (Expected Waiting Time) – This is the expected waiting time of the calls in the queue.
- AHT (Average Handle Time) – This is the average handling time for calls in the queue.
- ASA (Average Speed of Answer) – This is the average amount of time a caller spends in the queue before the call is offered to an agent.
- Staffed (Agents) – This is the number of agents managed by you that are in Sign-In, Available, Unavailable, or Wrap Up ACD state, as a ratio of all agents managed by you for this call center.
- Idle (Agents) – This is the number of agents who are in the Available ACD state but presently not on a call.
- Unavailable – This is the number of agents who are signed in to the call center but not available to take calls.
- Show Agents –When this check box is selected, the agents who are joined in the call center are displayed in the Agents area of the Dashboard.
The fields that provide visual indicators are Calls in Queue, Longest Waiting Time, EWT, AHT, and ASA.
Agent Information
The Dashboard displays information about the agents for the selected queues.
To display agent information:
- To select the queues for which you want to view agents’ information, check the Show Agents box on the lines for the queues in the Queues area of the Dashboard.
- To hide signed-out agents, check the Hide Signed Out Agents box at the top-right corner of the Dashboard.
The following information is provided for each displayed agent:
- Status – This is the agent’s combined phone and ACD state.
Note that the Status column is only sorted by the ACD state and it ignores the phone state.
- Name – This is the agent’s name.
- Queues (total) – This is the total number of queues to which the agent is assigned. This number is a link, which when clicked, opens a dialog box that lists the agent’s queues.
- Sign-In Time – This is the agent’s most recent sign-in time.
- Sign-In Duration – This is the amount of time that the agent has been signed in.
- Call State (Time) – This is the call state and time on the current call. The call state can be Idle, Ringing, or On a call. If an agent is in multiple calls, the call time reflects the time of the longest running call. When a call is released, then the call time reflects the time on the remaining calls.
- Agent State (Time) – This is the agent ACD state and time. If an agent is unavailable, the unavailable code is shown.
- % Available – This is the time that the agent was available to take calls shown as a percentage of the duration of the current sign-in.
- Avg Busy In – This is the average time spent by the agent on an incoming ACD call.
- Avg Busy Out – This is the average time spent by the agent on an outgoing ACD call.
- Avg Wrap-Up – This is the average time spent by the agent in a post call wrap-up.
Fields that provide visual indicators are Call State (Time), On Call, Idle, Agent State (Time), Unavailable, Avg Busy In, Avg Busy Out, and Avg Wrap-Up.
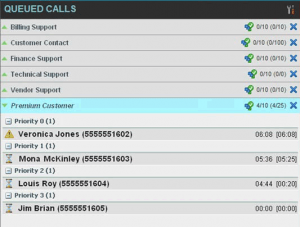
The Dashboard is designed to be used together with the Queued Calls pane and the Agents panel in the Contacts pane. The Dashboard provides you with a real-time view of agents and queues, while the Agents panel and Queued Calls pane allow you to take actions on monitored agents and ACD calls.
Select Information to Display
By default, Call Center displays information about call centers and agents. However, you may modify what information you want to appear in the Dashboard.
To select information to display:
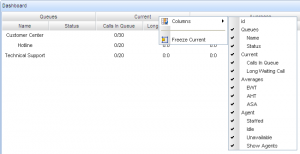
- Right-click the first row in the queued calls or agents table.
- From the menu that appears, select Columns.
- From the list of available columns, uncheck the columns you want to hide and check the columns you want visible.
- When you are done, click anywhere in the Dashboard outside the menu.
Navigate to Agent in Agent Directory or Queue in Queued Calls Pane
Call Center allows you to navigate to a call center queue in the Queued Calls pane or to an agent in the Agents directory directly from the Dashboard.
If the selected queue is currently not monitored, the application starts monitoring the queue as a special queue called the Quick Link Queue, which does not count toward the maximum of five queues that can be monitored. You can perform normal call operations on calls in the Quick Link Queue.
- When you close the Quick Link Queue, Call Center stops monitoring the queue and the queue is removed from the Queue
- When you click a non-monitored queue while there is already a queue monitored as Quick Link Queue, the new queue replaces the old queue as the Quick Link Queue and Call Center stops monitoring the old queue.
- To navigate from the Dashboard to a call center queue in the Queued Calls pane, click the name of the queue. The main window is brought to the foreground and the selected queue is displayed with an expanded listing of calls in the queue. All other queues are collapsed.
- To navigate from the Dashboard to an agent in the Agents directory, make sure that the Show Agents check box (on the row for the queue the agent is staffing), is checked and then click the agent’s name. The main window is brought to the foreground and the selected agent is displayed expanded in the Agents panel.


