- Home
- Knowledge Base
- Manage and Monitor Contacts
- View and Manage Directories in the Receptionist Client
This article describes the directory management functions provided in the Receptionist client.
Show or Hide Directories
To display a directory, click on its tab in the Contacts pane. To hide a directory, click the Close ![]() button on that directory’s tab.
button on that directory’s tab.
To select the directory tabs shown in the Contacts pane:
- At the top right-hand side of the Contacts pane, click
 (the down arrow button).
 - Select or unselect the directory to display/hide.
Sort Directory Entries
Click the header of the column you want to sort by. Click the header again to re-sort by that column in reverse order. The contacts in the selected directory are immediately reordered based on the selected field.
The column used to determine the current sort order is indicated in the header row with gold shading.
View Contact Details
Open a directory tab, then click on the contact to view. This expands the row for the contact, displaying additional information such as phone numbers.
Only one contact per directory can be expanded at a time. When you click a contact, the system automatically hides the details of the previously expanded contact.
View or Make a Note About a Contact
- In the Group/Enterprise directory, click the contact.
- Click the Notes link. The Notes for <Contact Name> dialog box appears.
- Enter the desired text, or view or modify the existing text, in the Notes text box.
- To save your changes and close the dialog box, click OK. To close the dialog box without saving, click Cancel.
Manage Personal Contacts
You can add or remove personal contacts via the TPx Web Portal or in the Receptionist client, and the updates appear in both places. However, the updates that you make via the TPx Web Portal won’t appear in Receptionist until the next sign-in.
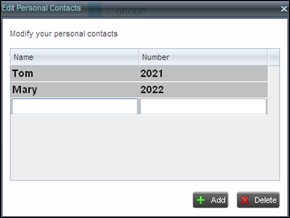
You cannot modify a personal contact entry. If you need to edit the information for an existing personal contact, delete the entry and add it again.
Add a Personal Contact
- In the Personal panel, click Edit
 . The Edit Personal Contacts dialog box appears.
 - Click Add. A new line is added below the existing entries, allowing you to define a new entry.

- In the Name text box, enter the contact’s name or description, as you want it to appear.
- In the Number text box, enter the phone number of the contact.
- To save the changes, click anywhere in the dialog box outside the entry.
Delete a Personal Contact
- In the Personal panel, click Edit
 . The Edit Personal Contacts dialog box appears.
 - Select the entry to delete and click Delete.
Search Contacts
The Search tab, located at the top of the Contacts pane, allows you to search for contacts in all of your directories.

- In the Search text box, enter the text you want to search for.
NOTE 1: You can enter partial information, such as part of a name or phone number. For example, if you do not remember whether Mary’s last name is spelled “Shelley” or “Shelly,” enter “Shell.”
NOTE 2: The search is not case-sensitive. Searching for “Ann” or “ann” will return the same results. - To restrict the search to contacts that start with the entered text, check the Begins with box. For example, entering “Ann” and checking Begins with will return contacts with names such as “Ann,” “Anne,” and “Ann Marie,” but not “Marianne” or “Mary Ann.”
- Click the Search
 button or press ENTER on your keyboard.
 - Search results are displayed in the Search panel. Each contact is listed with the name of the directory where they were found.

- To clear the search results, click Reset
 .
.
Manage Speed Dial Entries
NOTE: To use this feature, you need to have the Speed Dial 8 and/or Speed Dial 100 service assigned. If you only have one of these services, you will only see the entries for that service in your Speed Dial tab.
This directory allows you to manage and use your Speed Dial 8 and Speed Dial 100 entries. You can add or remove entries via the TPx Web Portal or in the Receptionist client, and the updates appear in both places. However, the updates that you make via the TPx Web Portal won’t appear in Receptionist until the next sign-in.
Add a Speed Dial Entry
- In the Speed Dial panel, click Edit
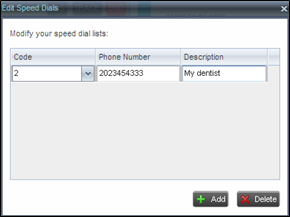
 . The Edit Speed Dials dialog box appears.
 - Click Add. A new line is added below the existing entries, allowing you to define a new entry.

- From the Code drop-down list on the left, select a speed dial code.
- In the Phone Number text box, enter the phone number to assign to the code.
- In the Description text box, enter a description that allows you to identify the entry.
- To save the entry, click anywhere in the dialog box outside the entry.
Edit a Speed Dial Entry
- In the Speed Dial panel, click Edit
 . The Edit Speed Dials dialog box appears.
 - Double-click the entry to modify. The entry becomes modifiable.
- Modify information as required.
- To save the changes, click anywhere in the dialog box outside the entry.
Delete a Speed Dial Entry
