- Home
- Knowledge Base
- Advanced Features in Group Profile Menu
- Dialable Caller ID
Dialable caller ID criteria are used to screen incoming calls and transform the caller’s phone number into a dialable format.
Configure Dialable Caller ID Settings For Your Group
- Log in to ucx.telepacific.com using your admin credentials.
- On the Group – Profile page, select Dialable Caller ID.
- Select a Dialable Caller ID Configuration: Use Group Criteria to use the dialable caller ID criteria defined for the group, or use Service Provider/Enterprise Criteria to use the criteria defined for the enterprise.
- Use NS Screening Failure Policy to select the action to take in case the caller’s phone number fails to be screened. Display the received caller ID will display the caller’s identity received from the network, Do not display the caller’s number will display only the caller’s name, and Do not display the caller’s name or number will not display the caller’s identity.
- Click Apply or OK to save your changes, or Cancel to exit without saving.
Add a Dialable Caller ID Criteria Entry
- Log in to ucx.telepacific.com using your admin credentials.
- On the Group – Profile page, select Dialable Caller ID.
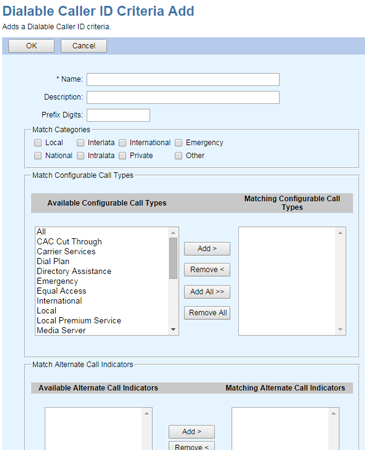
- Click Add. The Dialable Caller ID Criteria Add page appears.

- Enter a Name and Description for the entry.
- In the Prefix Digits text box, enter the digits to prepend to the caller’s phone number if the call satisfies the conditions specified in this entry.
- For Match Categories, select one or more of the following options: Local, National, Interlata, Intralata, International, Private, Emergency, or Other.
- For Match Configurable Call Types, select one or more call types and click Add to move them to the Available Configurable Call Types column.
- For Match Alternate Call Indicators, select one or more call indicators and click Add to move them to the Available Alternate Call Indicators column.
- Click Apply or OK to save your changes, or Cancel to exit without saving.
NOTE: When no criteria are selected within a group of criteria, it means that the group does not matter. If any criteria are selected within a group, the incoming call must match at least one of the selected criteria.
Change the Priority of a Dialable Caller ID Criteria Entry
- Log in to ucx.telepacific.com using your admin credentials.
- On the Group – Profile page, select Dialable Caller ID.
- In the Priority column of the row for the entry, type the new priority. You can enter any whole or decimal number.
- Click Apply. The criteria entries are re-numbered in the order you specified.
Modify or Delete a Dialable Caller ID Criteria Entry
- Log in to ucx.telepacific.com using your admin credentials.
- On the Group – Profile page, select Dialable Caller ID.
- Click Edit in the row of the criteria entry to edit. The Dialable Caller ID Criteria Modify page appears.
