- Home
- Knowledge Base
- Advanced Features in Services Menu
- Group Paging
The Group Paging service allows authorized users to page a group of users by dialing a phone number or extension.
Add a Paging Group
- Log in to ucx.telepacific.com with your admin credentials.
- Click Services on the left menu.
- On the Services page, click Group Paging in the Advanced column.
- The Group Paging page opens. Click Add.
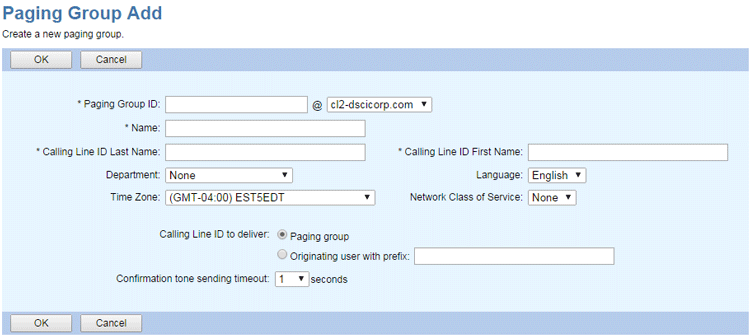
- The Paging Group Add page opens.

- Complete the fields on the Paging Group Add page; refer to the table below for full details. Required fields are marked with an asterisk.
- Click OK to save, or Cancel to exit without saving.
| Field Name | Description |
| Paging Group ID | ID for paging group. Select a domain from the dropdown list. |
| Name | Name of the paging group. |
| Calling Line ID Last Name | The last name to be displayed on lines with Caller ID. |
| Calling Line ID First Name | The first name to be displayed on lines with Caller ID. |
| Department | The department the paging group is associated with. Assigning the paging group to a department allows department administrators to modify the paging group. Select None to assign the paging group to the group. |
| Language |
The language in which service-specific messages are played during calls to the paging group. The default language is English. |
| Time Zone |
The time zone of the paging group. |
| Network Class of Service |
Select a NCOS from the Network Class of Service drop-down list. The NCOS is optional and can be removed by selecting None. |
| Calling Line ID to deliver |
The CLID to be presented to users when they are paged. To use the paging group’s CLID, select Paging group. To use the originator’s CLID, select Originating user with prefix. Optionally, enter a prefix to be delivered with the CLID such as “Page from: “. |
| Confirmation tone sending timeout: X seconds |
The time to wait after receiving the first answer from a target and before sending the confirmation tone to the originator. |
Modify a Paging Group
- Log in to ucx.telepacific.com with your admin credentials.
- Click Services on the left menu.
- On the Services page, click Group Paging in the Advanced column.
- The Group Paging page displays your current paging groups. Click Edit on the row of the one you want to modify.
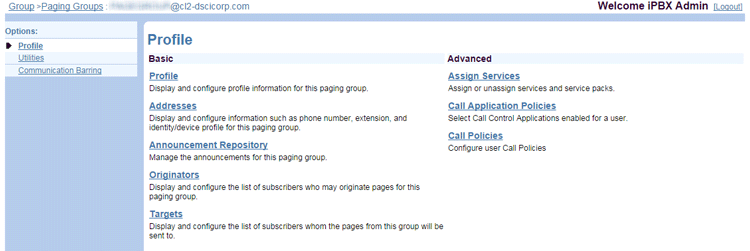
- The Profile page for the selected paging group opens.

- Click the Profile link in the Basic column.
- The Paging Group Modify page opens. Refer to the table above for details on the fields on this page.
- Click OK or Apply to save your changes, or Cancel to exit without saving.
Activate or Deactivate a Paging Group
- Log in to ucx.telepacific.com with your admin credentials.
- Click Services on the left menu.
- On the Services page, click Group Paging in the Advanced column.
- The Group Paging page displays your current paging groups.

- Check or uncheck the Active box in the row for the target paging group.
- Click OK or Apply to save your changes, or Cancel to exit without saving.
Delete a Paging Group
WARNING: This delete operation is final and cannot be undone.
- Log in to ucx.telepacific.com with your admin credentials.
- Click Services on the left menu.
- On the Services page, click Group Paging in the Advanced column.
- The Group Paging page displays your current paging groups. Click Edit on the row of the one you want to modify.
- The Profile page for the selected paging group opens.
- Click the Profile link in the Basic column. The Paging Group Modify page opens.
- Click Delete.
