- Home
- Knowledge Base
- Acct/Auth Codes Menu
- Account and Authorization Codes
Use the Acct/Auth Codes menu in the UCx Web Portal to provision account or authorization codes for outgoing long distance calls.
NOTE: If Account and Authorization Codes were not included on your initial order, please contact TPx’s Customer Care Provisioning team at 888-322-6553 to activate the codes.
Types of Codes
Account Codes (non-verified codes) track calls made outside the group by prompting the user for an account code. The system checks that the code contains the required number of digits, but does not validate the code against a pre-defined list. Since account codes are included in billing reports, this application is ideal for users who charge back toll calls and time to their clients.
Authorization Codes (verified codes) allow the user to place an outgoing call only after providing a valid, pre-defined code. This service does not override any restrictions set in the Outgoing Calling Plan of the user, his or her department, or the group. This application is generally used to track employee/departmental use of long distance and prevents unauthorized long distance charges.
Provision Codes
- Log in to ucx.telepacific.com with your admin credentials.
- Click Acct/Auth Codes on the left menu.
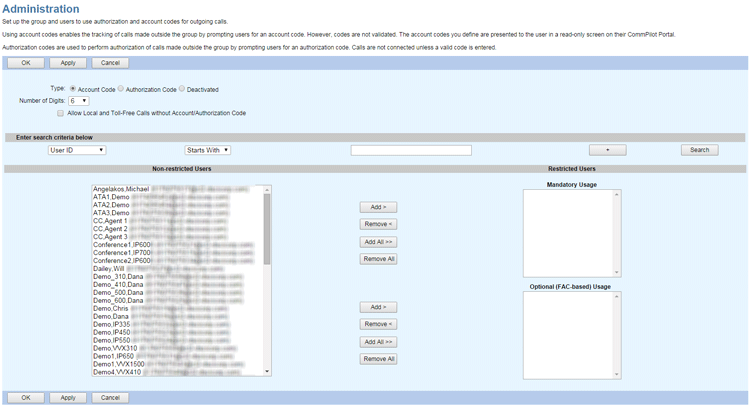
- On the Acct/Auth Codes page, click Administration.
- Select the code type: Account Code or Authorization Code. Deactivated (the default setting) means the system does not collect account codes or authorization codes.
- Select the length of the codes to be used by your group with the Number of Digits dropdown.
- Check the Allow Local and Toll-Free Calls without Account/Authorization Code box if you want to allow users to place local and toll-free calls without account or authorization codes.
- Search for the users to apply this code restriction to. Enter your search criteria and click Search, or leave the search fields blank and click Search to display all users.
- The users you searched for appear in the Non-Restricted Users column. Highlight the users you would like to be prompted for codes, and click Add to move the users to the Restricted Users column. Users in this category will be prompted for codes.

- If you are provisioning an Account Code, the Restricted Users column will be divided into two parts (as shown above):
- Mandatory Usage prompts the user for an account code on every outgoing call.
- Optional (FAC-based) Usage does not automatically prompt the user for an account code. To supply an account code for a call, the user may dial a feature access code (FAC): *47 to activate and *37 to deactivate. Calls without account codes proceed normally.
- To remove a restriction for specific users, select the users in the Restricted Users column and click Remove, or click Remove All to remove the restriction for all users.
- Click OK or Apply to save your changes, or Cancel to exit without saving.
Create and Delete Codes
The codes shown here will also appear on the user’s Account Codes page.
- Log in to ucx.telepacific.com with your admin credentials.
- Click Acct/Auth Codes on the left menu.
- On the Acct/Auth Codes page, click Codes Management. Any current codes are displayed.
- To add a code, click Add. On the Codes Management Add page, type the numerical code, describe/name the code (optional), and click OK. Note that the code you enter here must meet the restriction on the number of digits you set on the Administration page (see the Provision Codes section, above).
- To delete a code, check the Delete box next to it, then click OK or Apply.
