Seamlessly place UCx with Webex calls from within Microsoft Teams without interrupting your workflow or switching between applications.
Overview
Microsoft Teams users now have access to a comprehensive enterprise grade UCx with Webex Calling experience through an enhanced integration. Accessible with a single click from within the Microsoft Teams interface, users have access to Webex Calling features like mid-call control, voicemail, call history, directory search, and our market-leading Audio Intelligence noise removal technology.
Seamlessly integrated into the Microsoft Teams interface, businesses can now provide users with the proven, reliable enterprise calling experience they need with Webex Calling directly from within Microsoft Teams.
Webex Calling integration with Microsoft Teams provides users with the best calling experience through the Microsoft Teams interface. It’s included at no additional cost with a UCx with Webex Softphone service from TPx.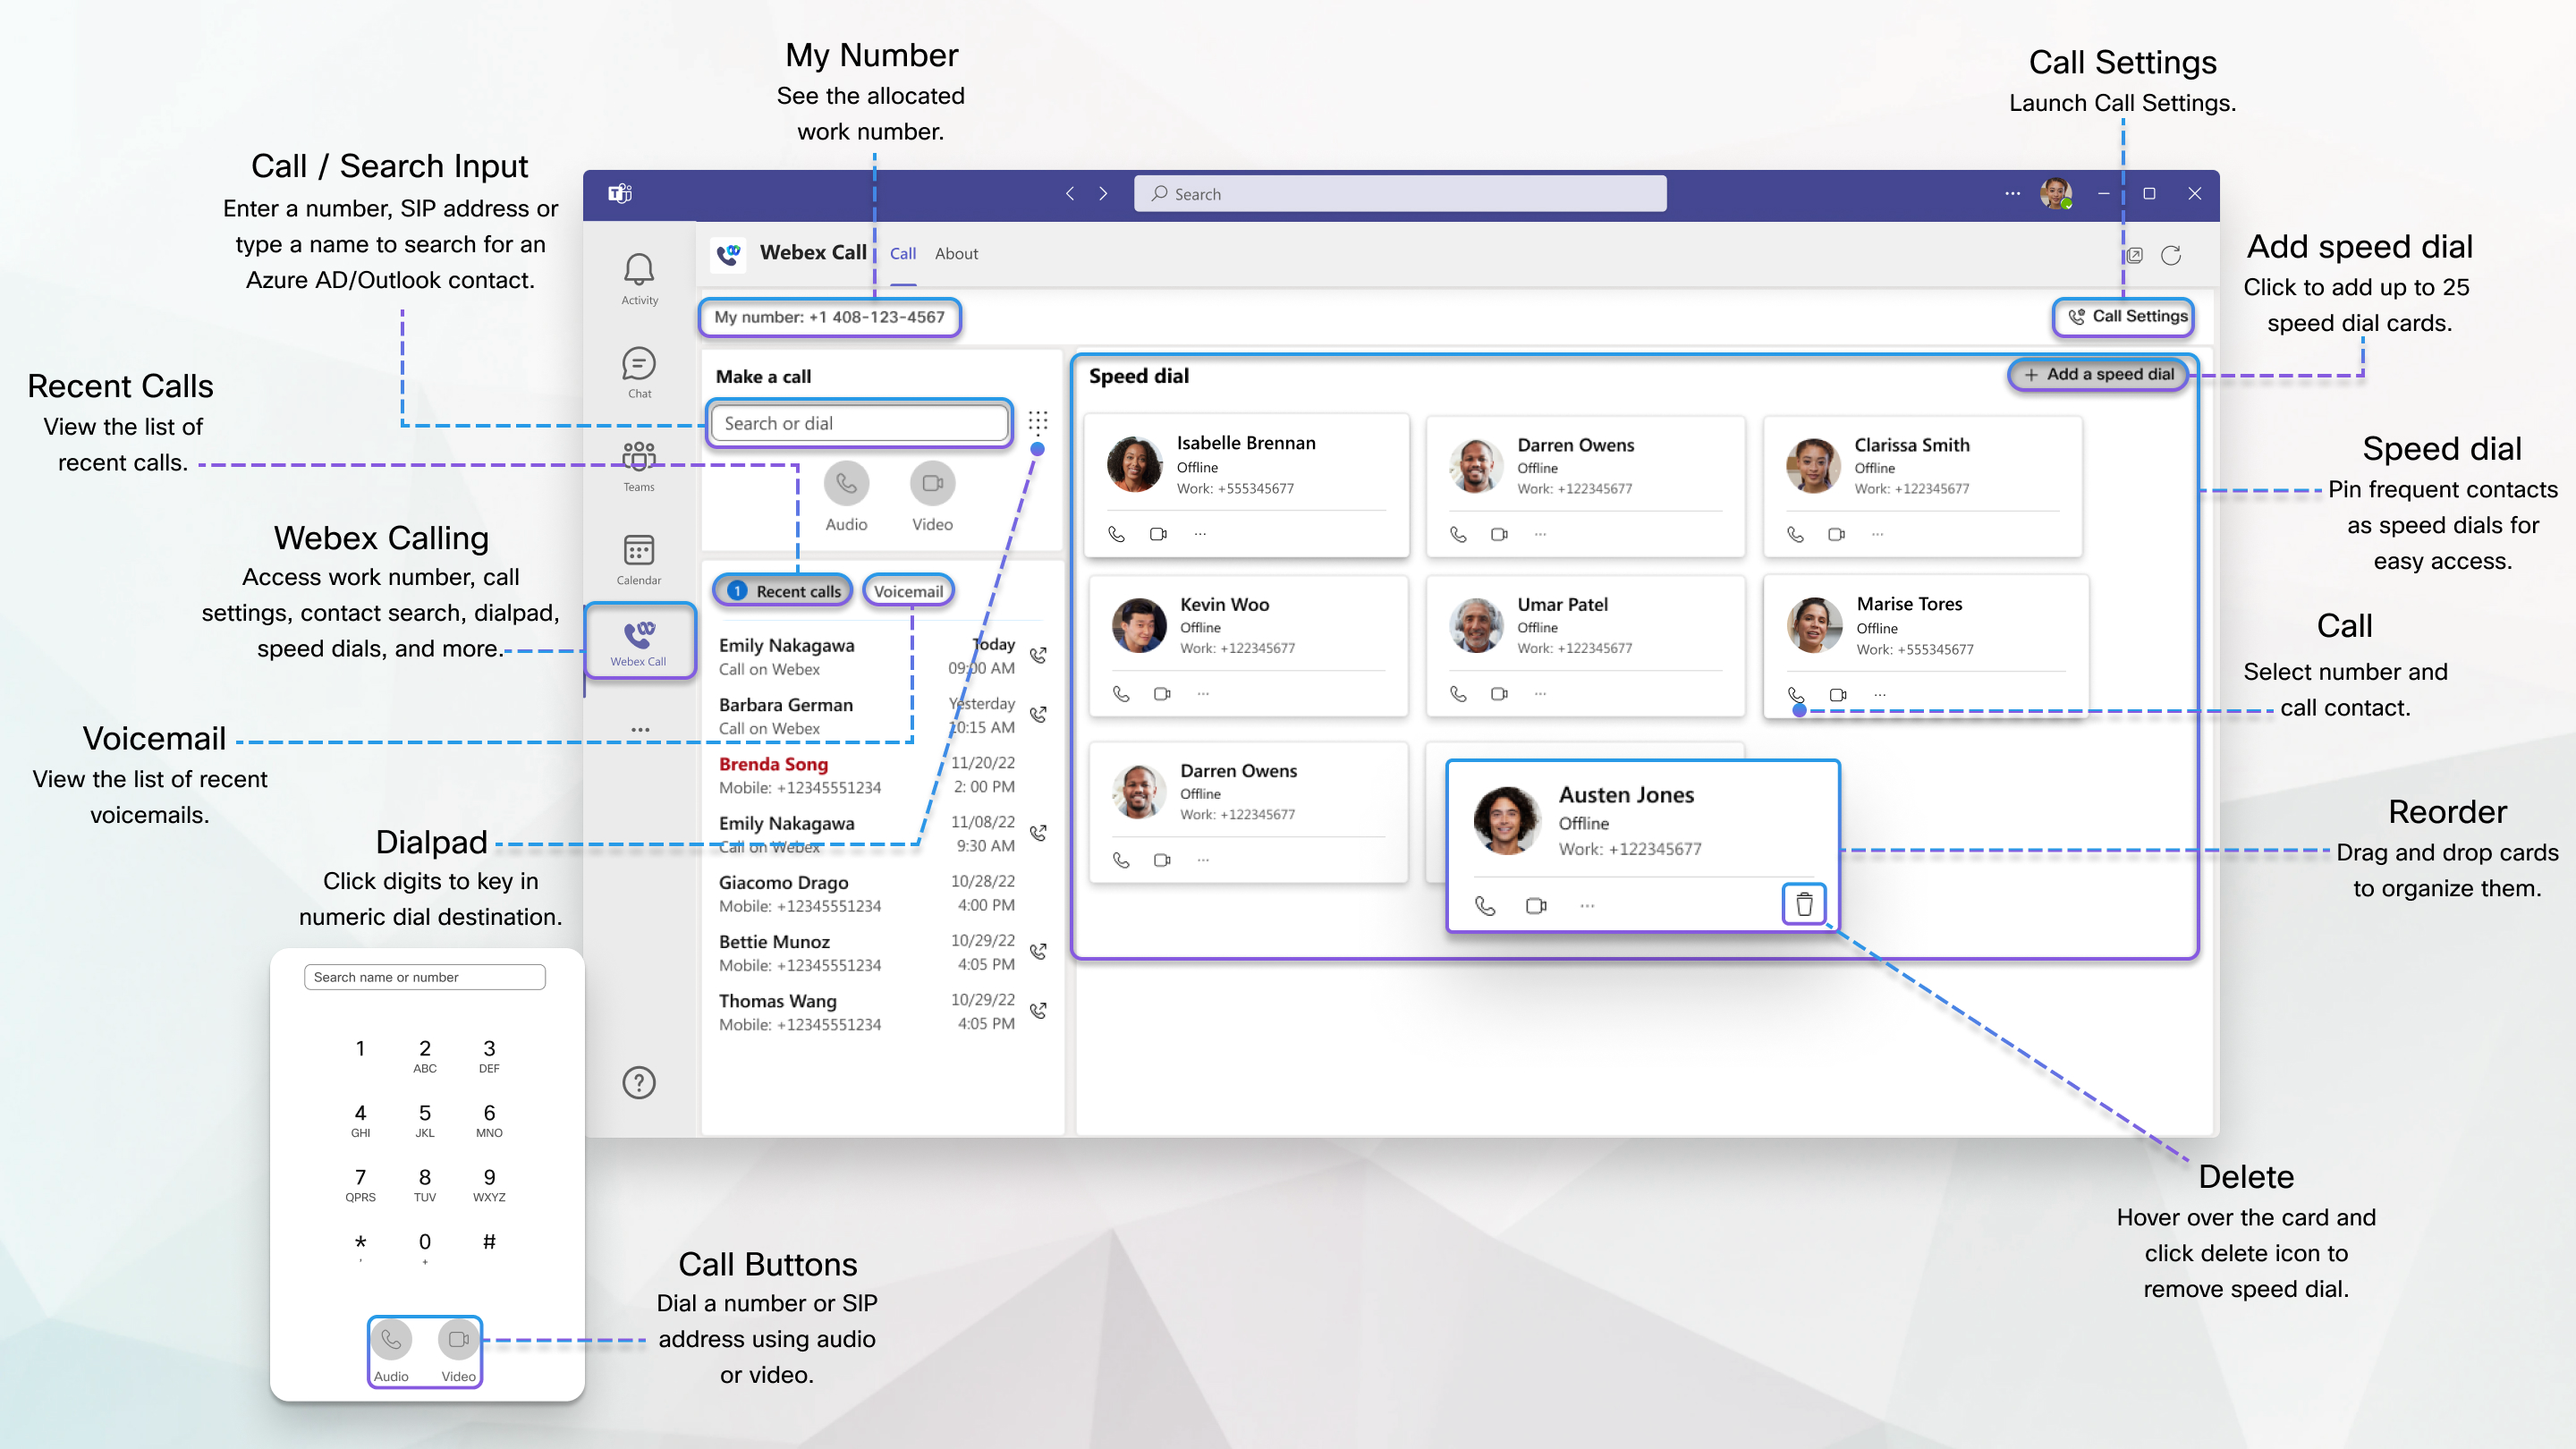
Prerequisites
- Webex App and Microsoft Teams
- Latest or a supported release of UCx with Webex (Min of Softphone only licensw)
- Configure Microsoft Teams: Teams Administrators must configure your Teams app with Webex Calling. Refer to Configure Microsoft Teams for Webex Calling for details.
Make a Call
| 1 | In the team space, click Webex Call |
||
| 2 | Start typing a name, telephone number, or video address of the person you want to call.
|
||
| 3 | Select the contact you wish to call and click |
Turn a chat into a call
| 1 | In direct chat, click Webex Call |
| 2 | Select the number under the contact to view calling options in the drop-down list. |
| 3 | Click The app opens in a new window. |
| 1 | In direct chat, click Webex Call |
| 2 | Select the number under the contact to view calling options in the drop-down list. |
| 3 | Click The app opens in a new window. |
Call a channel member
Use Webex Calling to call another member in the channel and without creating a direct space.
Before you begin
Administrators––Click Webex Call to access permissions and allow Read the members of channels.
| 1 | In a channel, click Webex Call |
| 2 | Start typing the member’s name in the Select or search field, then select their name.
(Optional) Click the drop-down under their name to change the outbound call options. |
| 3 | Click |
Add up to 20 contacts inside or outside of your Outlook or Azure Active Directory as speed dials. The app saves your speed dials to your Microsoft 365 profile so you can call your most frequent contacts quickly and easily.
| 1 | Go to Webex Call |
||
| 2 | Click Add a speed dial. | ||
| 3 | Type the name of a directory contact, or for a custom contact.
· Add an Outlook or Azure Active Directory contact—Select the contact and choose the number from the drop-down. · Add a custom contact—Click Create new speed dial and enter the Name and Phone.
|
||
| 4 | Click Add. |
Manage speed dials
Go to Webex Call ![]() in the side menu.
in the side menu.
- Edit a custom contact—On a contact’s card, click Ellipses > Edit speed dial.
- Re-arrange your speed dials—Click and drag your speed dials to change the order of how they appear on the screen.
- Remove a speed dial contact—On the contact card, click Ellipses > Remove from speed dial.
View recent calls
Missed a call and want to see who it was? See up to 20 of the calls you’ve made, received, and missed in the last 7 days in your Recent calls. You can even call them back at the same number they called you from.
The contact name, phone number, and call type isn’t displayed for unknown numbers.
BroadWorks administrators must enable unified call history to ensure this feature works correctly. See Webex for Cisco BroadWorks Configuration Guide for more details.
UCM On-prem administrators must enable unified call history to ensure this feature works correctly. See Webex Call Integration with Microsoft Teams for On-prem UCM for more details.
For Dedicated Instance, see Webex Call Integration with Microsoft Teams for Dedicated Instance for more details.
For UCM Cloud, see Webex Call Integration with Microsoft Teams for UCM Cloud for more details.
| 1 | Go to Webex Call |
| 2 | In your Recent calls, hover over a call and click Note: Recent calls list in Webex Calling tab is auto-refreshed every one minute so that you have the visibiliy of latest recent call records. |
Find your work phone number and access call settings
Go to Webex Call in the side menu, you can find My number at the top left corner which shows your work number.
You can now access and update Webex App call settings directly from the Webex call integration in the Microsoft Teams, without having to interact directly with the Webex App.
| 1 | Go to Webex Call |
| 2 | Click Call Settings at the top right corner. |
| 3 | Update your settings and click Save.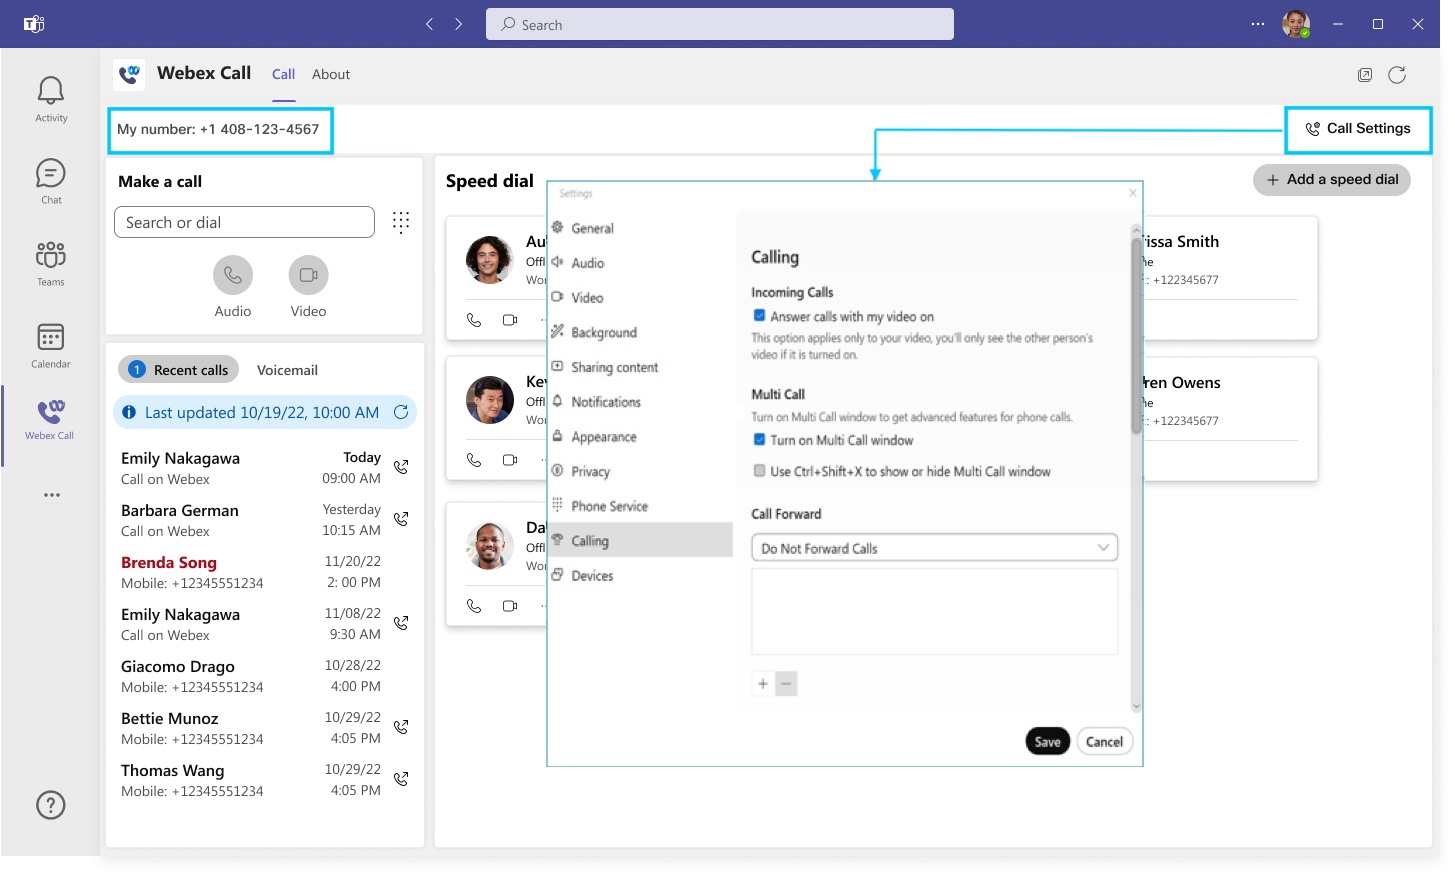 |
Configure Microsoft Teams for UCx with Webex Calling
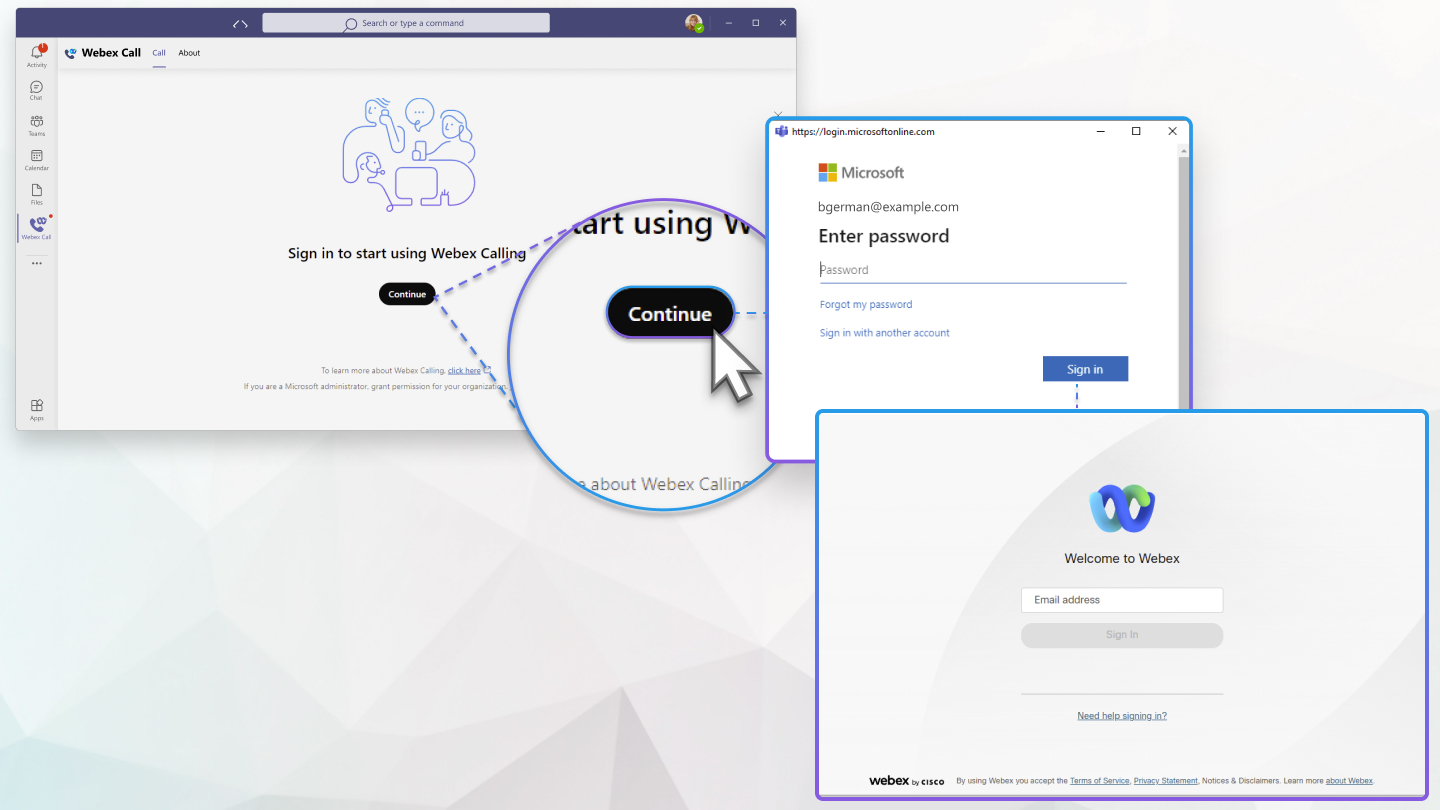
Install the Webex Calling as the default calling option for all users in your organization.

Use this article to configure your Teams app with Webex calling options. The ![]() icon is added to the left navigation and as a messaging extension. With the Teams calling option turned off, everyone in the organization uses the same platform to make and receive calls.
icon is added to the left navigation and as a messaging extension. With the Teams calling option turned off, everyone in the organization uses the same platform to make and receive calls.
Before you begin
- Verify that users have been assigned a seat licensefor UCx with Webex (Softphone Only Seat) from TPx
- Users must have the Webex App
- Make sure you are a Teams Administrator.
- It can take a few hours for changes in Microsoft Teams to take effect.
| 1 | Sign in to Teams admin center to manage your apps and allow Webex Call.
a. In the Dashboard menu, go to Teams apps > Manage apps. b. In the search box, enter Webex Calland select the app name, then click Allow > Allow. When you allow an app on the Manage apps page, it’s allowed org-wide. |
| 2 | Manage third-party apps in your Permission policies to allow Webex Call.
a. In the Dashboard menu, go to Teams apps > Permission policies. b. Select the Default policy (or create a new policy). Users in your organization will automatically get the global policy unless you create and assign a custom policy. You can create a new policy to apply your own permissions for users, installation of apps, and custom apps for your organization. After you edit or assign a policy, it can take a few hours for changes to take effect. c. Select the Third-party apps drop-down, then Allow specific apps and block all others. d. Click Allow apps and search for Webex Call. e. Hover over Webex Call and click Add > Allow > Save. How you manage third-party apps for your organization is up to you. Specifically add Webex Call if you restrict access to other third-party apps. |
| 3 | Install Webex Calling, then add the icon to the Webex app and unpin the built-in calling option.
a. In the Dashboard menu, go to Teams apps and click Setup policies > + Add. Give the new policy a name. b. Under Installed apps, click +Add apps and search forWebex Call. c. Hover over the app name and click Add > Add. d. Under Pinned apps, click +Add apps and search forWebex Call. e. Hover over the app name and click Add > Add. f. To unpin the built-in calling option, remove Calling from the App bar list. Make sure Webex Call is added to the top of both the App bar column list, and to Messaging extensions column. g. Click Save. The Webex Calling is pinned to the apps menu and as a messaging extension for all users. |
| 4 | Optional––disable the built-in calling option org-wide and make Webex Call the only call option:
a. In the Dashboard menu, go to Voice > Calling policies. b. Select the Default policy (or create a new policy). Create a new policy to apply your own permissions for users, installation of apps, and custom apps for your organization. c. Turn Make private calls to Off, then click Save. Users aren’t able to access the built-in calling option. |
Configure to hide Webex App window for Microsoft Teams users
The TPx administrator of the Webex Call integration with Microsoft Teams, can configure to hide the Webex App window when users interact with the Webex Call integration with Microsoft Teams.
For organizations that have chosen to use the Webex Call integration with Microsoft Teams, the integration is the users’ primary interface to UCx with Webex services. Once configured, the Webex App will still be installed and running on your users’ computers, but its window will be closed by default. Actions taken in the Webex Call integration may launch specific features in the Webex App, but, in general, the users don’t need to interact with the Webex App.
Your TPx administrator, through Control Hub, can configure to hide the Webex App window in the following levels:
- Organization level
- User-group level
- User level
Configure to hide Webex App window for an organization
The settings configured at the organization level automatically apply to all users under the organization.
| 1 | From the customer view in https://admin.webex.com, go to Services in the left navigation bar and click Calling > Client Settings. |
| 2 | Go to Microsoft Teams integration section, toggle on Hide Webex windows. |
Configure to hide Webex App window for a user-group
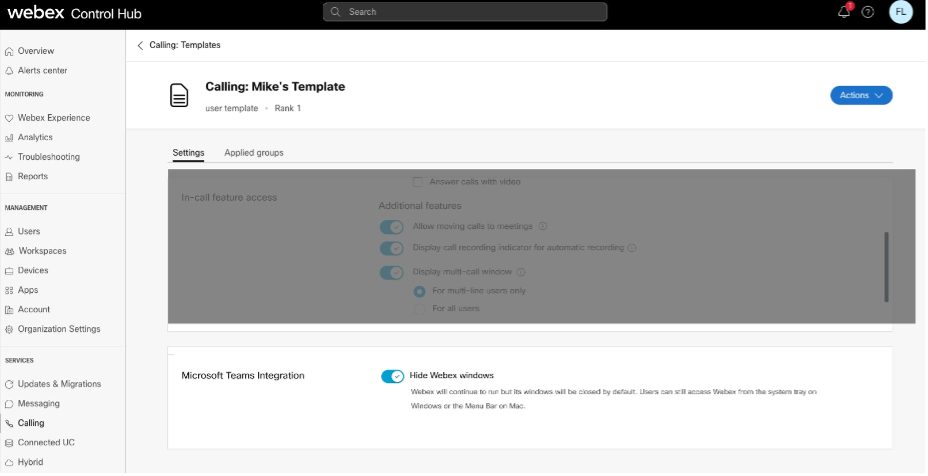
TPx administrator can configure to hide the Webex App window for a user-group through a Calling template. Create a template and assign to a user-group. The configuration in the template applies to all users in the group.
To create a new template to hide Webex App window:
| 1 | From the customer view in https://admin.webex.com, go to Services in the left navigation bar and click Calling > Client Settings > Templates. |
| 2 | Click Create template. |
| 3 | In the General section, type the Template name and description. |
| 4 | In the Microsoft Teams integration section, toggle on Hide Webex windows. |
| 5 | Click Create template and next. |
| 6 | Search and select a group for this template in the search box. |
| 7 | Click Done.
To delete your template, click the template and choose Delete from the Actions drop-down list. In the Delete template page, check the check box informing you that deleting a template is permanent, and then click Delete. To modify the template, click the template, modify the toggles and click Save.
|
To apply an existing template to a user-group:
Few pointers to consider when applying the Calling templates:
- When a user is on boarded to an organization, the user inherits the settings from the organization-level.
- If the user is added to a user-group, then the settings from the Calling template apply.
- If a user belongs to multiple user-groups, then the template with the highest rank (Rank 1) takes the highest precedence and that template settings apply.
- If the user has individual user settings, then these settings take precedence over user-group or organization-level settings.
See Configure settings templates for more information about managing your templates.
You can apply the existing template either from Group section or Calling section.
To apply template from Group section, see: Configure settings template.
To apply from the Calling section, perform the following steps:
| 1 | From the customer view in https://admin.webex.com, go to Services in the left navigation bar and then click Calling > Client Settings > Templates. |
| 2 | Click the ⋮ icon next to an existing template and then click Apply template. |
| 3 | Type the group name to which you want to apply the template and then choose the group. |
| 4 | Click Done. |
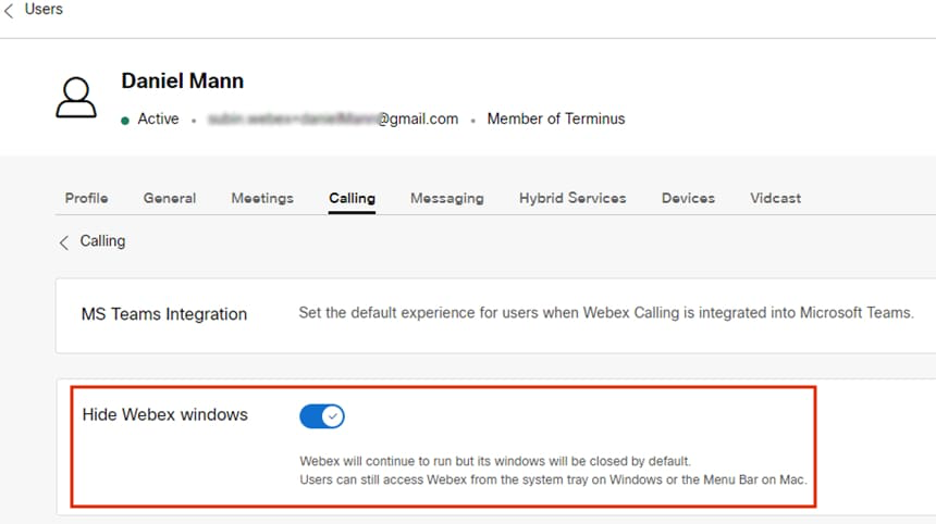
Configure to hide Webex App window for a user
The individual user settings value overrides the organization-level and user-group level settings.
| From the customer view in https://admin.webex.com, go to Management in the left navigation bar and click Users. | ||
| Choose the user and then click Calling. | ||
| Go to User Call Experience and click Microsoft Teams Integration. | ||
Toggle on Hide Webex windows.
|
Once you’ve configured, the users need to restart their Webex App, and sign in to view the change.
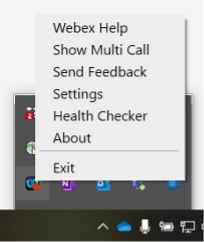
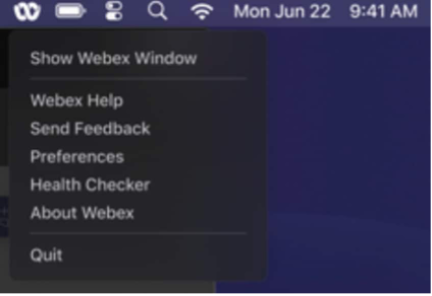
If users want to interact with the Webex App itself, they can access it from the system tray on Windows and the menu bar on Mac. The Webex App is visible only in the Windows taskbar or macOS dock when a window is active and in-use.
|