- Home
- Knowledge Base
- Advanced Features in Incoming Calls Menu
- Selective Call Acceptance
Selective Call Acceptance allows you to accept calls only from the numbers of your choice. When you receive a call from a phone number that is not included in your Selective Call Acceptance list, the caller will hear an announcement that you are presently not accepting calls from their number.
Access the Selective Call Acceptance Page
- Log in to ucx.telepacific.com.
- Click Incoming Calls on the left-hand menu.
- On the Incoming Calls page, click the Selective Acceptance link in the Advanced column.
- The Selective Call Acceptance page opens.
Add Selective Call Acceptance Criteria
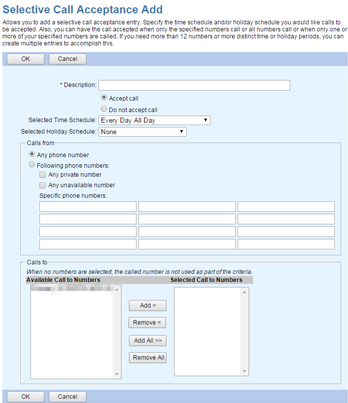
- From the Selective Call Acceptance page, click Add. The Selective Call Acceptance Add page opens.

- In the Description field, enter a description for the entry.
- To enable the service, select Accept call. To disable the service, select Do not accept call.
- Use the Selected Time Schedule dropdown to specify the time schedule for this service.
- Use the Selected Holiday Schedule dropdown to specify the holiday schedule for this service.
NOTE: Click here for more information on time and holiday schedules. If you haven’t set up any schedules yet, your only choices on this page will be:
- Selected Time Schedule: “Every Day All Day” and any group- or enterprise-level time schedules
- Selected Holiday Schedule: “None” and any group- or enterprise-level holiday schedules
- Use the Calls from box to specify which calls will trigger the service:
- Select Any phone number to accept all calls.
- To accept calls from specific phone numbers, select Following phone numbers and enter up to 12 specific 10-digit phone numbers in the Specific phone numbers boxes.
NOTE: You can use wild cards. Use ? to replace a single digit anywhere in the digit string, or * at the end of a group of digits. (Examples: 45055512?4, 450555??34, 4505?5*)
NOTE: If you need to add more than 12 phone numbers, create multiple criteria entries.
- Check Any private number to accept calls from private numbers.
- Check Any unavailable number to accept calls from unavailable numbers.
- Use the Calls To box to apply Selective Call Acceptance to specific numbers. Select the numbers by moving them to the Selected Call To Numbers column. In the Available Call To Numbers column, select the number(s) and click Add, or click Add All to select all numbers. To remove numbers from the Selected Call To Numbers column, select the numbers to remove and click Remove, or click Remove All to remove all numbers.
NOTE: If no numbers are selected, this field is ignored.
- Click OK to save changes. You are returned to the Selective Call Acceptance page. The new entry appears with the Active box checked.
Modify Selective Call Acceptance Criteria
On the Selective Call Acceptance page, locate the entry you want to modify. Then:
- To deactivate the entry without deleting or making changes to it, uncheck the Active box for that entry. To reactivate, check the Active box again.
- To make changes to an entry, click the Edit link for that entry. The Selective Call Acceptance Modify page opens. Follow the steps used to create the entry (see above), then click OK to save changes.
- To delete an entry, click the Edit link for that entry, then click the Delete button. The entry is immediately deleted, and you are returned to the Selective Call Acceptance page.
Related Articles
-
Selective Call Rejection
- 7046
-
Priority Alert
- 2894
-
Pre-Alerting Announcement
- 2195
-
Custom Ringback
- 2377
-
Call Forwarding Selective
- 5813
-
External Custom Ringback
- 1430
