The Executive page of the UCx Web Portal allows you to define an assistant pool that will answer calls for you. As the executive, you can configure call filtering, screening, and alerting, or your Executive-Assistants can manage these settings for you.
Access the Executive Page
- Log in to ucx.telepacific.com.
- Click Call Control on the left-hand menu.
- On the Call Control page, click the Executive link in the Advanced column.
- The Executive page opens to the Assistants tab.

Assistants Tab
NOTE: Assistants viewing their Executive’s page cannot see this tab.
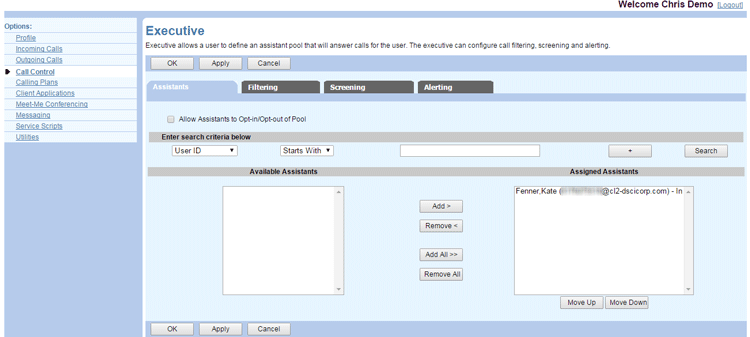
You use the Assistants tab to assign other users to your assistants pool. An available assistant is any user within the enterprise or group who has the Executive-Assistant service assigned. An assistant can be assigned to more than one executive.
-
To allow assistants to opt in and out of the pool, check the Allow Assistants to Opt-in/Opt-out of Pool box. To disallow it, uncheck the box.
NOTE: When this box is unchecked, the status of all the assigned assistants is reset to Opt-in.
- Search for assistants. To locate a specific user, enter search criteria in the search fields and click Search. To view all users, leave the search fields blank and click Search. Users that satisfy your criteria appear in the Available Assistants column.
- Assign assistants. Select the assistant(s) in the Available Assistants column and click Add to move them to the Assigned Assistants column. To assign all available users, click Add All.
- Order your selected assistants. In the Assigned Assistants column, select an assistant and use the Move Up and Move Down buttons until you place the assistant at the desired position. Repeat for other assistants until you are satisfied with the order. The system distributes your calls to assistants in this order when using the sequential alerting mode.
- Click OK or Apply to save changes, or Cancel to exit without saving.
Filtering Tab
You use the Filtering tab on the Executive page to specify which incoming calls should be routed to your assistants. Calls that meet your filtering criteria are routed to your assistants, and unfiltered calls are routed to you.

- To enable call filtering, set Call Filtering to On. To disable it, select Off.
NOTE: When call filtering is disabled, all calls are routed to you.
- For Call Filtering Mode, select Simple or Advanced.
- If you selected Simple, select one of the following options: All Calls, All Internal Calls, or All External Calls.
- If you selected Advanced, make sure that at least one filtering criteria entry is defined and activated (see Add Filtering Criteria, below).
- Click OK or Apply to save changes, or Cancel to exit without saving.
Add Filtering Criteria
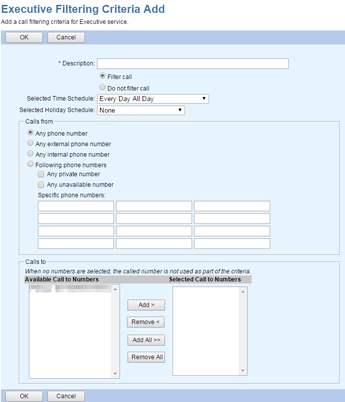
- On the Filtering tab of the Executive page, click Add. The Executive Filtering Criteria Add page opens.

- In the Description text box, type a name describing this entry.
- To route calls meeting these criteria to executive assistants, select Filter call. Otherwise, select Do not filter call.
- Select the time and holiday schedule during which to apply the filtering action.
NOTE: Define your time schedules on the Schedules page. If you haven’t added any time schedules, your only choice is “Every Day All Day” and any group- or enterprise-level schedules.
- Specify the phone numbers to use to filter calls: Any phone number, Any external phone number, Any internal phone number, or (to filter calls from specific phone numbers) Following phone numbers. If you select Following phone numbers, check Any private number and/or Any unavailable number if desired, then enter ten-digit phone numbers in the Specific phone numbers boxes.
NOTE: You can use wild cards. ? replaces a single digit anywhere in a digit string.* represents a digit string and can appear only at the end of a group of digits and ? wild cards. Examples: 45055512?4, 450555??34, 4505?5*
NOTE: To specify more than 12 numbers, add another filtering criteria entry.
- Use the Calls To box to apply filtering to specific numbers. Select the numbers by moving them to the Selected Call To Numbers column. In the Available Call To Numbers column, select the number(s) and click Add, or click Add All to select all numbers. To remove numbers from the Selected Call To Numbers column, select the numbers to remove and click Remove, or click Remove All to remove all numbers.
NOTE: If no numbers are selected, this field is ignored.
- Click OK to save changes, or Cancel to exit without saving. You are returned to the Executive page.
Screening Tab
You use the Screening tab on the Executive page to configure call screening settings for the Executive service.

- To enable call screening, set Call Screening to On. To disable it, select Off.
- For Alert Type, select Silent or Ring Splash.
- Check or uncheck the following options: Alert BroadWorks Mobility Location, Alert BroadWorks Anywhere Locations, and Alert Shared Call Appearance Locations.
NOTE: A check box for an option appears only if the corresponding feature is assigned to you.
- Click OK or Apply to save changes, or Cancel to exit without saving.
Alerting Tab
You use the Alerting tab on the Executive page to configure call alerting settings for your Executive service.

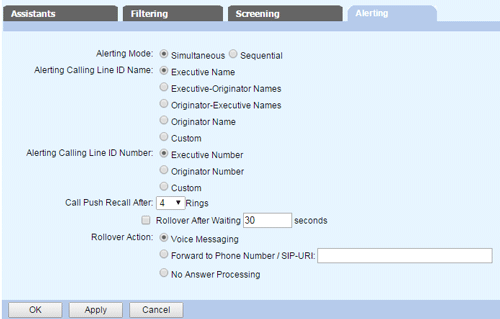
- Select an Alerting Mode: Simultaneous or Sequential.
- Select the alerting calling line ID name: Executive Name, Executive-Originator Names, Originator-Executive Names, Originator Name, or Custom. If you select Custom, provide an Alerting Custom Calling Line ID Name and (optional) a Unicode Alerting Custom Calling Line ID Name in the boxes that appear.
- Select the alerting calling line ID number: Executive Number, Originator Number, or Custom. If you select Custom, provide an alerting calling line ID number in the text box that appears.
- From the Call Push Recall After dropdown, select the number of rings after which a call pushed to you by an executive assistant is recalled to the assistant if you do not take the call.
- Specify when to alert the next assistant, if applicable. If you selected the sequential alerting mode, select the number of rings before alerting the next assistant from the Advance to Next Assistant After dropdown.
- Specify what to do with a call routed to your assistants when no assistant answers the call. To specify the rollover time-out, check the Rollover After Waiting check box and enter the number of seconds after which the system should stop alerting assistants and perform the rollover action for the call.
- For Rollover Action, select one of the following:
- Voice Messaging to send the call to your voice mail.
- Forward to Phone Number/SIP-URI and enter a phone number to forward the call to another number.
- No Answer Processing to provide a busy treatment to the call.
NOTE: For both the simultaneous and sequential modes, the rollover action is triggered when either there are no assistants left who could answer the call or the optional rollover timer set on this page expires.
- Click OK or Apply to save changes, or Cancel to exit without saving.
Related Articles
-
Call Recording
- 0
-
Quick Reference Guide – Anywhere
- 2039
-
Anywhere
- 4405
-
Executive-Assistant
- 2001
-
Zone Calling Restrictions
- 1826
-
Video Add-On
- 1450
