- Home
- Knowledge Base
- Agents
- Generate Reports
Call Center provides reporting functions to agents and supervisors. Agents can only generate reports about their own activity. Supervisors have access to reports on the activity and performance of agents and call centers under their supervision.
The Reporting feature allows you to run reports and schedule reports to run in the future using predefined templates. Reports can be of type Agent or Call Center.
The report templates available to you depend on how your administrator has configured your system.
You use the Reporting link at the top of the main interface to access pages used to generate and schedule reports.
This article provides an example of a report. For the list of canned report templates available for report generation, see the Call Center Reports Guide.
Run a Report
NOTE: Call Center supervisors can run multiple reports in parallel. An agent can only run one report at a time.
- Click the Reporting link at the top right-hand side of the main window. A Report window appears.
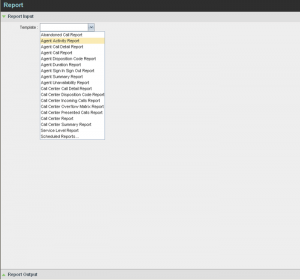
- Select a report template from the drop-down list. The page displays the input parameters for the report.
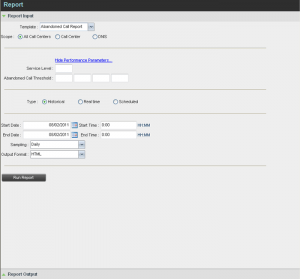
- Fill in the required information. The input that you need to provide depends on the template you select and the report type. The following table explains the input parameters for all reports.
| Input Field | Description | Allowed Value |
| Scope | For Agent Reports, it allows you to specify the agents to include in the report. You can check All Agents or Agents. If you check Agents, select agents from the drop-down list.NOTE: This parameter is disabled when an agent runs the report, since agents can only run reports about themselves. | All Agents, Agents |
|
All Call Centers, Call Center, DNIS | |
| Call Completion | This setting is used to count the number of ACD calls an agent has completed within a service level during the specified interval. The Call Completion service level can be set to “1” through “7200” seconds. | 1 through 72000 |
| Short Duration | This setting is used to count the number of ACD short duration calls completed by an agent during an interval. You can set the maximum length of a short duration call to “1” through “7200” seconds. | 1 through 7200 |
| Service Level | This setting allows you to provide up to five service levels, used to perform service-level calculations for each call center or DNIS. Each service level can be set to “1” through “7200” seconds. | 1 through 7200 |
| Service Level Options | These settings are used to determine whether certain types of calls should be included in the service-level calculations:
|
These options can be checked or unchecked. |
| Abandoned Call Interval | If you selected the Include Abandoned Calls Except in Defined Interval option, enter the desired interval in this text box in seconds. | 1 through 7200 |
| Service Level Percentage | This setting allows you to specify the service-level objective (expressed as a percentage of calls). | |
| Type | This can be checked as Historical or Real time.
Real-time reports for individual agents contain data for each time interval, with the last interval reflecting real-time data, if requested (subject to the refresh rate). When the interval switches over, the final data for the last time period is captured and shown as historical data and real-time data is reflected in the new time interval. |
Historical or Real time |
| Start Date | This is the date when you want the report to start. It can be set by typing in the text box or clicking the Calendar icon. This is compulsory. The oldest historical date depends on the interval selected:
|
MMM DD, YYYY |
| Start Time | This is the time when you want the report to start. You can select the hour format (A.M., P.M., or Military time) from the Hour Selection Type. Time is applicable for hourly and minute intervals only. | 1:00 am through 12:59 am, 1:00 pm through 12:59 pm, or 0:00 through 23:59 |
| End Date | This is the date when you want the report to end. It can be set by typing in the text box or clicking the Calendar icon. This is required when a Historical report is selected. | MMM DD, YYYY |
| End Time | This is the time when you want the report to end. You can select the hour format (A.M., P.M., or Military time) from the Hour Selection Type. Time is applicable for hourly and minute intervals only. This is required when a Historical report is selected. | 1:00 am through 12:59 am, 1:00 pm through 12:59 pm, or 0:00 through 23:59 |
| Sampling | This sampling period is only applicable to interval-based report templates and determines how the report information is presented. For example, an hourly report displays information for each hour of the report time frame. | 15 minutes, 30 minutes, Hourly, Daily, Weekly, Monthly |
| Output Format | This allows you to specify in what format you would like the report output to be generated. If you select Hypertext Markup Language (HTML) or PDF, the report in displayed in the Report window. If you select Excel File Format (XLS), a file is created that you can save on your computer. | PDF, XLS, HTML
|
4. Click Run Report.
The results of the report are displayed in the Report Output area of the window. See the following section for an example of a report.
NOTE: If you select the PDF report format and are using Adobe Reader 10.01 or later, you will need to disable the Enable Protected Mode at startup setting. Otherwise, report results are not displayed.
To disable the protected mode in Adobe Reader, perform the following steps.
- Close all opened Internet Explorer and Adobe Reader instances.
- Open Adobe Reader.
- From the menu bar, select Edit and then Preferences. The Preferences dialog box appears.
- From the Categories menu on the left, select General.
- Uncheck Enable Protected Mode at Startup.
- Click OK.
- Close Adobe Reader.
Schedule Report
To schedule reports, your company (group or enterprise) must have Enhanced Reporting enabled. For more information, see your administrator.
To schedule a report:
- Click the Reporting link at the top right-hand side of the main window. A Report window appears.
- Select a report template from the drop-down list. The page displays the input parameters for the report.
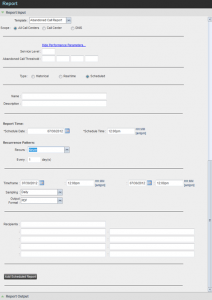
- For Type, select Scheduled.
- Provide the name and the description of the report.
- Specify the recurrence pattern of the report. From the Recurs drop-down list, select one of the following options: Never, Daily, Weekly, Monthly, or Yearly. Never signifies that this is a one-time report.
- If you selected Daily, enter the frequency of recurrence in days.
- If you selected Weekly, enter the frequency of occurrence in weeks and select the day of the week when you want the report to be generated.
- If you selected Monthly, enter the frequency of occurrence in months and specify the day when you want the report to be generated. Select one of the following options:
- To schedule the report on a specific day of the month, for example, the twenty-seventh, check Day <X> of the month and enter the day.
- To schedule the report on a specific day of the week within the month (for example, the second Monday of the month), check The <X> <Day of week> of the month and select X and Day of week from the drop-down lists.
- If you selected Yearly, specify the frequency of occurrence in years (for example, every two years), and specify the day for the recurrence of the report. Select one of the following options:
- To schedule the report on a specific day of the year, check Day <X> of <Month> and select the day and the month.
- To schedule the report on a specific day of the week and month (for example, the first Sunday of January), check The <X> <Day of week> of <Month> and select X, Day of week, and Month from the drop-down lists.
- Specify when the report should run.
- For a nonrecurrent report, specify the actual date and time to generate the report.
- For a recurrent report, specify when the report should be generated for the first time.
NOTE: The start date and run time (and, for weekly reports, the day of the week) determine when the report is generated for the first time. The subsequent times are determined by the recurrence pattern and range.
- For a recurrent report, specify when the reporting should end. For Recurrence Range, select never from the following options:
- Never
- After <X> occurrences, and enter the number of occurrences.
- Date, and select a date from the calendar.
- Specify the report time frame (that is, the period for which you are requesting the report).
- For a nonrecurrent report, enter the actual dates and times.
- For a recurrent report, select the time frame relative to the report generation time (for example: the previous month, previous five days, and so on).
NOTE: A report time frame always has a beginning date and time and an end date and time. For a recurring report, the relative time frame is converted to the actual dates and times at the moment that the report is run.
The actual time frame always starts at the top of the hour, day, week, month, or year and is based on the selected time zone and day of the week. For example, if a report is scheduled to run every day at 5:45 P.M. for the previous two hours, then the actual time frame of the report is from 3:00 P.M. to 5:00 P.M. of the day when the report is run.
- Specify the sampling frequency. From the Sampling drop-down list, select a frequency.
- Specify the output format of the report. From the Output Format drop-down list, select a format.
- Enter the e-mail addresses of the recipients of the report.
- Enter the remaining parameters, as required.
- Click Schedule Report.
The report is scheduled. It is run at the specified ties and sent to the recipients configured in the report schedule.
Manage Scheduled Reports
You can list, modify, and delete scheduled reports.
To manage scheduled reports:
- Click the Reporting link at the top right-hand side of the main window. A Report window appears.
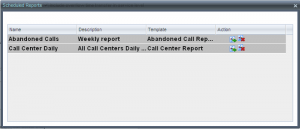
- From the drop-down list, select Scheduled Reports. A Scheduled Reports dialog box appears, listing the reports that you have scheduled.


