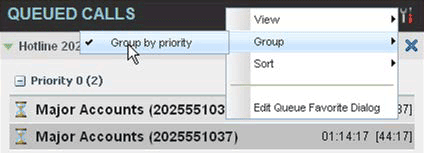
Group Queued Calls
You can group or ungroup queued calls by their priority bucket.
- In the Queued Calls Pane, click Options
 .
. - From the drop-down list, select Group, and then select or deselect Group by Priority. This action applies to all monitored call centers.
- To ungroup calls, unselect the Group by Priority option.
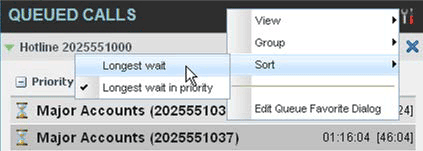
Order Queued Calls
Queued calls can be ordered according to their total waiting time or their waiting time in the current priority bucket. To order queued calls:
- In the Queued Calls pane, click Options .
- Select Sort and then the ordering option you want. This operation applies to all monitored call centers.
Monitor Next Call
To silently monitor the next call that is received by a call center:
- In the Contacts pane, expand the Queues panel and click the target call center to expand it.
- Click SMN for that call center. A monitoring call is established for the selected call center.
When the next call is received and answered by an agent, you are conferenced in to the call and your call is muted. Both calls appear in the Conference Call panel.
To barge in on a call you are silently monitoring:
In the Conference Call panel, click BARGE. You are conferenced in to the call.
Retrieve Call from Queue
To retrieve queued calls from the queue to your phone device, click the call in the Queued Calls pane and click Retrieve for that call.
Once you retrieve a call, the call appears in the Call Console and you treat it as any other call. For example, you can transfer it to an ad hoc number or to another queue.
Promote Call in Queue
A priority is attached to an incoming call based on the DNIS number on which it is received. Calls are distributed to the agents staffing the queue based on this priority, with calls of the higher priority being exhausted before calls in the next priority are distributed.
You can manually promote calls from a lower priority bucket to a higher priority bucket. A manually promoted call ends up as the last call in the higher priority bucket with a wait time of zero seconds.
To promote a call (change its priority):
- In the Queue Calls pane, expand a Call Center panel.
- Click the call you want to promote and click Promote for that call.
The queued call is promoted to the end of the next highest priority bucket.
Transfer Call to Another Queue
To transfer a queued call to another queue:
- In the Queued Calls pane, select the call to transfer.
- In the Contacts pane, expand the Queues panel.
- Click the target queue and click TXR for that queue.
The call is transferred and removed from the queue.
Transfer Call from Queue to Agent
To transfer a call from a queue to an agent:
- In the Queued Calls pane, select the call to transfer.
- In the Contacts pane, expand the Agents panel.
- Click the target agent and click TXR for that agent. If there is more than one number available for the agent, use the drop-down arrow next to TXR to select from the available numbers for the agent.
The call is transferred and removed from the queue.
Transfer Call to Ad Hoc Number
To transfer a call to an ad hoc number:
- In the Queued Calls pane, select the queued call.
- In the Dialer, enter the destination number and click Transfer.
![]()
The call is transferred and removed from the queue.
Change Position of Call in Queue
You can reorder a queued call in a Standard call center or in the “0” priority bucket in a Premium call center.
To change a call’s position in a queue:
- In the Queued Calls pane, click the target call to expand it.
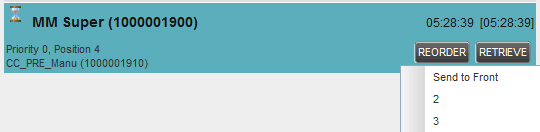
- Click Reorder and select the new position in the queue from the list that appears.
The call is placed in the new position.
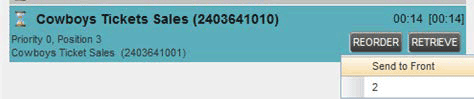
Transfer Call to Top of Queue
If your administrator has configured the call center with the Transfer to Top feature, follow this procedure to transfer the call to the top of the queue.
You can only transfer a call to the top of the highest priority bucket (bucket with priority “0”).
There need to be at least two calls in the target queue.
- In the Queued Calls pane, click the target call to expand it.
- Click Reorder and select Sent to Front from the list that appears.