- Home
- Knowledge Base
- Basic Features in Incoming Calls Menu
- Call Notify
Call Notify sends you a notification e-mail containing the caller’s name and number (if available) when a call matches your pre-defined criteria. You can use this feature to create an archive of callers or to determine if you missed any important calls.
The criteria for each Call Notify entry include a list of up to 12 phone numbers or digit patterns and a specified time schedule. All criteria for an entry (including phone number, day of week, and time of day) must be met for the system to send an e-mail.
- Log in to ucx.telepacific.com.
- Click Incoming Calls on the left-hand menu.
- On the Incoming Calls page, click the Call Notify link in the Basic column.
- The Call Notify page opens.

- Enter the e-mail address to send the notifications to. Click Apply to save changes.
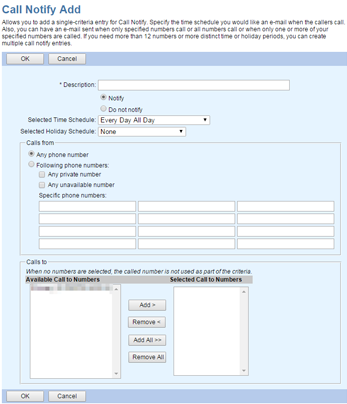
- Click Add to enter the criteria for the notification. The Call Notify Add page opens.

- In the Description field, enter a description for the notification.
- To enable notification, select Notify. To disable notification, select Do not notify.
- Use the Selected Time Schedule dropdown to specify the time schedule for this service.
- Use the Selected Holiday Schedule dropdown to specify the holiday schedule for this service.
NOTE: Click here for more information on time and holiday schedules. If you haven’t set up any schedules yet, your only choices on the Call Notify Add page will be:
- Selected Time Schedule: “Every Day All Day” and any group- or enterprise-level time schedules
- Selected Holiday Schedule: “None” and any group- or enterprise-level holiday schedules
- Use the Calls from box to specify which calls will trigger a notification:
- Select Any phone number for notification on all calls you receive.
- For notification on calls from specific phone numbers, select Following phone numbers and enter up to 12 specific 10-digit phone numbers in the Specific phone numbers boxes.
NOTE: You can use wild cards. Use ? to replace a single digit anywhere in the digit string, or * at the end of a group of digits. (Examples: 45055512?4, 450555??34, 4505?5*)
NOTE: If you need to add more than 12 phone numbers, create multiple Call Notify entries.
- Check Any private number to receive notification on all calls from private numbers.
- Check Any unavailable number to receive notification on all calls from unavailable numbers.
- Use the Calls To box to apply Call Notify to specific numbers. Select the numbers by moving them to the Selected Call To Numbers column. In the Available Call To Numbers column, select the number(s) and click Add, or click Add All to select all numbers. To remove numbers from the Selected Call To Numbers column, select the numbers to remove and click Remove, or click Remove All to remove all numbers.
NOTE: If no numbers are selected, this field is ignored.
- Click OK to save changes, or Cancel to exit without saving.
